By Ms Shi & Mr He
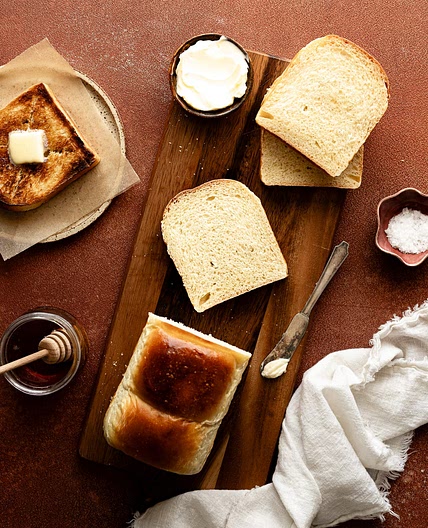
Japanese Milk Bread
23 steps
Prep:2hCook:30min
This recipe teaches us how to make the most authentic, softest, and fluffiest Japanese Milk Bread at home. The pre-fermented dough (biga) in this recipe can bring an extra rich flavor and fluffy texture to your Japanese milk bread. And the pre-fermented method saves you much time on the second day, so that you will be able to make this warm and soft bread after you get home from work or school.
Updated at: Thu, 09 Jul 2026 21:39:16 GMT
Nutrition balance score
Unbalanced
Glycemic Index
71
High
Glycemic Load
133
High
Nutrition per serving
Calories1490.8 kcal (75%)
Total Fat66.1 g (94%)
Carbs189.1 g (73%)
Sugars50.1 g (56%)
Protein38.4 g (77%)
Sodium1333 mg (67%)
Fiber7.8 g (28%)
% Daily Values based on a 2,000 calorie diet
Ingredients
1 servings
1 cupbread flour
+ 2 tbsps, can be substitued with all purpose flour
½ cupmilk
can be substitued with soy milk, coconut milk, almond milk, or oat milk
1 tspactive dry yeast
½ cupbread flour
2 Tbspmilk powder
highly recomanded but optional
1egg
large, seperate the egg white and egg yolk
¼ cupheavy whipping cream
+ 1 tbsp
3 Tbspsugar
½ tspsalt
1 tspbutter
softened at room temperature
Instructions
Make the pre-fermented dough (biga)
Step 1
Microwave ½ cup of milk for 30 seconds to warm but not hot. Stir to evenly distribute the heated and cold milk. (The wamed milk should feel similar to your body temperature, about 100 °F/38°C.)
Step 2
Sprinkle 1 tsp of active dry yeast over the surface of milk, stir to get all the yeast moistened. Set aside to proof for 10 minutes.
Step 3
Mix the milk yeast mixture and 1 cup + 2 tbsps bread flour in a mixing bowl. Mix with hands or a stand mixer until there's no dry flour in the mixing bowl. Shape the dough into a ball. (It's normal if the dough looks rough like a cauliflower.)
Step 4
Cover with food wrap, let the dough rise under room temperatue (about 72 °F) for 1 hour. Transfer the dough to the fridge, allow it to keep rising in the fridge overnight (about 12 hours, can go upwards of 48 hours).
Make the final dough
Step 5
Add bread flour, milk powder (optioanl), egg white, heavy whipping cream, sugar, and salt to the mixing bowl of stand mixer. Tear the pre-fermented dough (biga) into small pieces and add to the mixing bowl.
Step 6
Knead the dough with stand mixer at medium speed (speed 3) for about 10 minutes until the dough turns very sticky.
Step 7
Pause the stand mixer, add 1 tsp of room-temperature softened butter to the dough.
Step 8
Keep kneading the dough with stand mixer at medium high speed (speed 4) for about 25 minutes until the dough looks smooth and the sides of the mixing bowl looks clean.
Step 9
Do the window pane test to the dough.
Step 10
Shape the dough into a ball, place the dough back to the mixing bowl and cover with food wrap. Set aside and allow the dough to grow under room temperature (72 °F) for 40 minutes - 1 hour, until it's doubled in size.
Step 11
Transfer the dough to a non-stick pastry mat (or a lightly floured working surface). Cut the dough into 3 equal portions.
Step 12
Shape each dough into a ball. Cover with food wrap, set aside, and allow them to rest under room temperature for 15 minutes.
Step 13
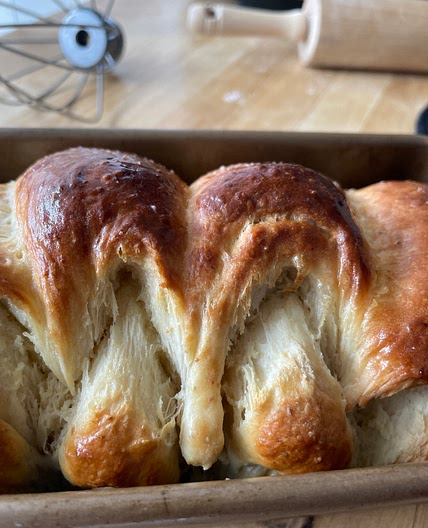
Take one of the dough, place it on the non-stick pastry mat with the smooth surface facing down. Press gently with your fingers to squeeze out the air. Cover the rolling pin with some food wrap (or lightly flour the rolling pin) to prevent it from sticking. Roll the dough into a 12×3 inch rectangle. (My loaf pan is 3 inch wide. You should make your dough the same width of your loaf pan.)
Step 14
Roll up each dough into a log shape.
Step 15
Take one of the dough, place it vertically with the smooth surface facing down and the sealed end facing up. Roll it out into a 12×3 inch rectangle again. Repeat with all the doughs.
Step 16
Place 3 doughs side by side in a loaf pan. (Brush a thin layer of cooking oil/butter to the loaf pan if it's not non-stick.)
Step 17
Create a warm and moist environmen by setting the oven to 95°F (35°C), and putting a bowl of hot water by the loaf pan. Allow the doughs to proof in the oven for 1 hour until doubled in size.
Step 18
Add ½ tbsp of milk to 1 egg yolk, mix well.
Step 19
Gently brush the top surface of each dough with a layer of milk egg yolk mixture.
Step 20
Preheat oven to 350°F (180°C). Send back to bake at 350°F for 30 minutes.
Step 21
After baking for 10 -15 minutes, when the surface of the loaf has reached the desired brownish color, cover the loaf with a foil to prevent it from over-coloring.
Step 22
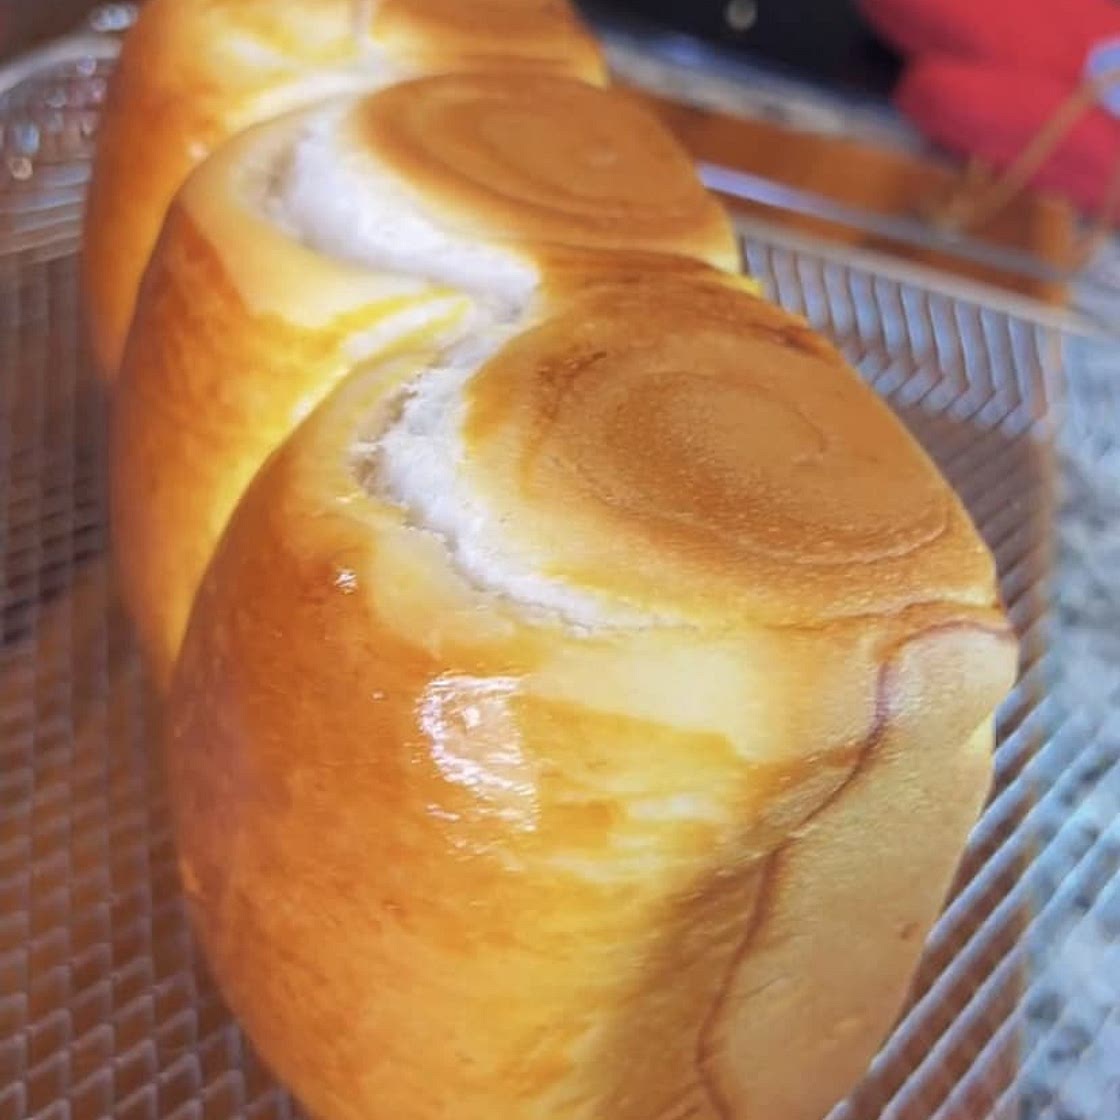
Take out the loaf pan from the oven, transfer the loaf to cooling rack, allow it to cool down on with its side up. (Laying the bread loaf on its side can prevent the bread from shrinking.)
Step 23
This Japanese milk bread tastes best when it's warm!!! Can be stored in an airtight container under room temperature for three or four days, or in a freezer bag in the freezer for up to three months. Never keep your bread in the fridge.
View on Ms Shi & Mr He
↑Support creators by visiting their site 😊
Notes
0 liked
0 disliked
There are no notes yet. Be the first to share your experience!