Nutrition balance score
Uh-oh! We're unable to calculate nutrition for this recipe because some ingredients aren't recognized.
Ingredients
6 servings
Praline Layer
¾ cupsugar
¾ cupdark brown sugar
salt
1 ½ Tbspcorn syrup
½ cupevaporated milk
1 Tbspbutter
½ tspvanilla extract
½ cupsliced hazelnuts
½ cupsliced almonds
Lemon Curd Layer
Genoise Layer
5eggs
large, room temperature
½ cupsugar
¼ tspsalt
¾ cupcake flour
sifted twice, You can make your own cake flour using regular flour and cornstarch!)
¼ cuplimoncello
this is alcoholic- if you are under 21, either get a parent to help, or use a simple syrup
Semi Freddo Layer
1 ¾ cupwhipping cream
Cream component
4egg yolks
2egg whites
Zabaglione and meringue components
½ cupsliced almonds
Final mix in
1 ¼ cupsugar
Meringue and zabaglione components
½ cuplemon juice
Zabalgione component
¼ tspsalt
Zabaglione component
1 tspcream of tartar
Meringue component
Candied Lemon Slices
Instructions
Step 1

Start by lining the bottom of your container. Set the container on a piece of parchment paper, trace around it, and cut out. Place in the bottom of your container, and spray the bottom lightly with non-stick spray.
Praline Layer
Step 2
Roast the nuts on the stove in a pan over medium heat. You'll need roasted nuts for this as well as the semi freddo, so it will behoove you to do it all together. Stir every few minutes until nuts are toasty brown and smell yummy. This can also be done in the oven, as seen in the anime, but I find I always burn things this way, so I avoid it if possible.
sliced hazelnuts½ cup
Step 3

While nuts are going, put all ingredients except for the nuts and vanilla into a pan over medium heat. Allow everything to melt together and start to bubble up. You will be cooking this for a long time, basically altering the structure of the sugar crystals, to make a soft candy.
Step 4

Stir constantly to avoid burning the candy, and get a glass of cold water (it MUST be cold) to test the done-ness of the candy. Every few minutes after the 5 minute mark, drizzle some candy into the cold water. If it immediately disperses into the water, it's not ready. If it turns kind of whispy but dissolves when you touch it, it's not ready. If you can pick it up and it's squishy but can keep a shape, it's done. Remove from heat immediately.
Step 5

Set aside to cool for 10 minutes then pour in the nuts and vanilla. Stir vigorously with a spoon for about two minutes to aerate the mixture and help it cool down more.
Step 6

Then, spread a thin, THIN layer of praline on the bottom of the container, using gentle motions to dab it into the corners and around the paper. My layer was way too thick, and ended up crushing the middle layer due to weight, so go really thin here, and be ok with the fact that you'll have a lot of leftover, which you can spread on a piece of parchment paper to cool and enjoy later.
Semi Freddo Layer
Step 7

whip the cream in a bowl with a whisk, using my patented fire-building technique of rolling the whisk handle between my palms vigorously. This took me about five minutes. You want hard peaks here, so it should stick up in firm peaks. I find this technique more effective than the standard side-to-side whisking method. Once done, set aside in the fridge.
Step 8

Over a pot of steaming water, whisk the egg yolks, 1/4 cup sugar, lemon juice, and salt together for 4 minutes traught. Do not stop whisking, or you will get lemony-sweet scrambled eggs. You can use a hand mixer instead.
Step 9

After four minutes, take off the heat and continue to whisk/ beat with a hand mixer until about doubled in size and lightened in color. Set aside.
Step 10

In a pot over steaming water, again, place a bowl or pot of egg whites, 1 cup sugar, and cream of tartar. With a hand mixer or whisk, beat continuously about 5 minutes until you have a white syrup.
Step 11

Then, off the heat, keep whisking/beating until the meringue is glossy, thick, and makes ribbons. When you lift the whisk/beaters, the meringue should fall in ribbons and sit on top without merging fully back into the rest of the meringue.
Step 12

Now it's time to mix it all together. Pour the zabagione into the meringue and fold it together. Don't stir, or you'll loose all the bubbles! Fold by scraping the bottom and bringing it over the top. Rotate the bowl, cut down the middle, scrape along the bottom, and fold up. Repeat until no streaks remain.
Step 13

Then, fold this into the whipped cream until no streaks remain.
Step 14

And finally, fold in the rest of the toasted nuts. Make sure they are completely cool at this point!
Step 15

Pour this on top of the praline layer, leaving some space at the top for the cake and lemon curd layers. Place in the freezer. If you have extra, set aside in a tupperware container and place in freezer.
Lemon Curd Layer
Step 16

Take out your two lemons and zest both of them.
Step 17

Place zest and sugar in a Magic Bullet mixer, a food processor, or a bowl. I used a Magic Bullet knockoff because, hey, I'm doing what I can in this strange kitchen. Ironically, I didn't notice the food processor sitting innoculously on the counter, which would have been my first choice. Blend until zest is super fine.
Step 18

Blend in eggs one by one, and then olive oil, then salt, then lemon juice. Once it's all thoroughly mixed together, place in a pan over medium low heat and stir continuously, about 10 minutes until the curd thickens up and you can draw a line in the curd on the back of a spatula.
Step 19

Set aside in a bowl, and let chill in the fridge.
Genoise Layer
Step 20
Start by pre-heating the oven to 350 and line a baking sheet with some parchment paper. The baking sheet should have edges, and should be both long and wide enough to bake a sheet cake that could fit the bottom of your container.
Step 21
Aerate the flour and salt by whisking it vigorously, or sifting it twice.
Step 22

Heat the butter in a pan and let it brown up. You'll know it's ready when it goes from golden to brown and starts to smell nutty and amazing. At first it will get all foamy on top, and then gradually the surface will clear, revealing the brown shade.
Step 23

Next, place eggs and sugar in a bowl, and set over a pot of simmering water. Be careful to not let the water touch the bottom of the pan, and start whisking. Don't let the water boil. Whisk continuously for 5 minutes (if you stop, you'll get sweet scrambled eggs).
Step 24

Once five minutes are up, remove from the heat and keep mixing until the mixture is about tripled in volume and the batter makes ribbons- when you let it drip from the mixers, it creates a ribbon of batter that sits on top and doesn't sink back into the rest of the batter. This is the part that took me 40 minutes by hand. PLEASE use a hand or stand mixer.
Step 25

In thirds, carefully fold the flour mixture into the egg mixture. Be really careful here- you don't want to deflate your egg mixture too much and, after 40 minutes of whisking, it's pretty disheartening to see how quickly it de-fluffs. Only add the next portion when you can't see any more flour.
Step 26

Add a cup full of this mixture to the butter and stir together until combined. Add this back into the big bowl of egg mixture and fold together until just combined and you can't see any more flour or butter.
Step 27

Pour this into the prepared baking pan, but pour it close to the pan so more bubbles don't pop out of existence forever. You want the final product to be about an inch thick, so allow it to spread out so that it's big enough to fit in the bottom of your container, but still has the proper thickness. Yes, you can get a pan with the exact specifications you want, but I didn't have one, so I guestimated.
Step 28

Bake 18-20 minutes, or until cake springs back at the touch and is golden brown on sides and, faintly, on top. DO NOT open the oven until you are sure it's ready, or it could deflate.
Step 29
Allow this to cool on the pan about five minutes then slide over onto a cooling rack and let it to cool completely.
Step 30

When nice and cool, slide your container out of the freezer and hold it over the cake (don't set it right on top- the cake is delicate and may stick to the container). Trace an outline with a knife, then set the container back in the freezer. Cut the cake to the right length and width.
Step 31

Get out your limoncello and prepare to soak the front and back of your sheet of cake. To control the flow, I poured my lemoncello into this big spoon, tipped it back, and let the liquid slide up the handle and out of the little hole. I drizzled this all over the cake. If you have a squeeze bottle or a pastry brush, these would both do the same trick effectively.
Step 32

Take container back out of the fridge, as well as the lemon curd. Semi freddo should be stiff on top, definitely more sturdy than it was when it first went in. Place a careful spoonful of lemon curd on top. If it doesn't sink in, spoon more on top and spread very gently. Alternatively, place in a plastic bag, snip off the tip, and pipe the curd onto the semifreddo in a thin, even layer. I found this helpful when trying to get into the corners. Save some for a plate garnish.
Step 33

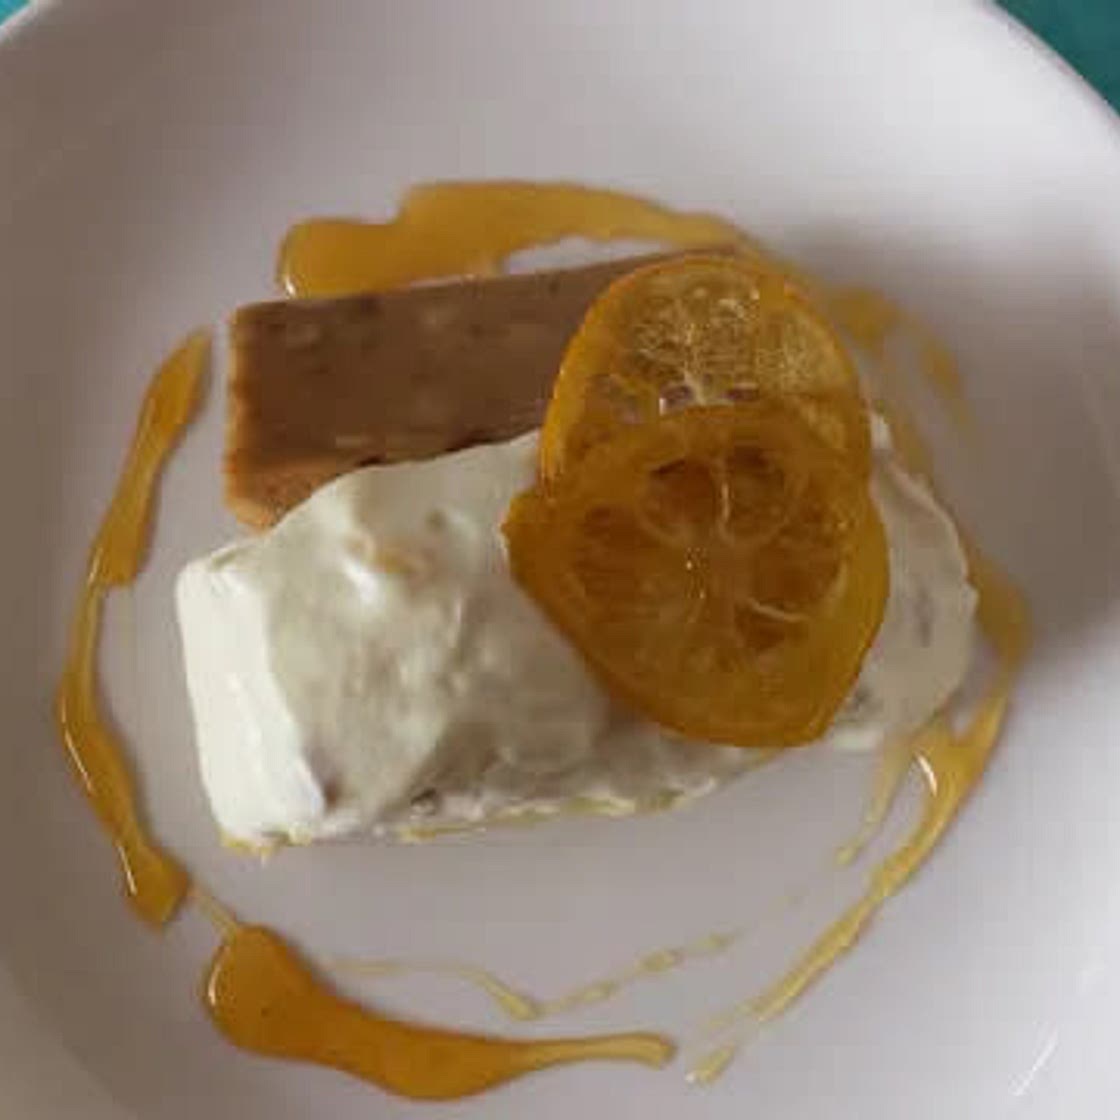
Finally, place your cake layer on the very top.
Step 34
And now, freeze. For more at least 12, and preferably an entire day.
Candied Lemon Slices
Step 35

Slice one lemon thinly. Pick out all the seeds.
Step 36

In a pan, heat the sugar, water, and juice of a lemon. Add in the lemon slices and arrange them into a single layer.
Step 37

Allow the sugar water to simmer for about 15 minutes, or until slices become transluscent and the rind softens.
Step 38

When ready, arrange slices on a piece of wax paper and place in the freezer to cool quickly.
Step 39

When the lemon slices are cool, take out your dessert and get ready to plate. Fill your sink with hot water, and submerge the container in the water for a few seconds. Do not allow the water to go over top of your dessert.
Step 40

This will melt just the very outer layer, allowing the dessert to slide cleanly out. When ready, invert onto a cutting board.
View on Emily Bushman
↑Support creators by visiting their site 😊
Notes
0 liked
0 disliked
There are no notes yet. Be the first to share your experience!