Gluten Free White Bread - The Loopy Whisk
100%
0
Nutrition balance score
Uh-oh! We're unable to calculate nutrition for this recipe because some ingredients aren't recognized.
Ingredients
0 servings
20gpsyllium husk
whole, If using psyllium husk powder, use only 17g
360gwater
lukewarm
145gtapioca starch
You can use an equal weight of cornstarch, US cornflour, UK, potato starch or arrowroot starch instead
145gmillet flour
plus extra for flouring the surface, You can use an equal weight of finely milled/ground brown rice flour instead
50gsorghum flour
You can use an equal weight of light buckwheat flour, white teff flour or oat flour instead Use the latter only if you're not sensitive to oats
15gcaster sugar
8gsalt
6ginstant yeast
If using active dry yeast, use 8g
15golive oil
8gapple cider vinegar
1egg white
US large medium, whisked, for brushing the bread before baking
Instructions
Step 1
Make the psyllium gel In a bowl, mix together the psyllium husk and lukewarm water. After about 30-45 seconds, a gel will form.
Step 2
In a large bowl or the bowl of a stand mixer (if using), whisk together the tapioca starch, millet flour, sorghum flour, sugar, salt and instant yeast.
Step 3
If using active dry yeast instead, you need to activate it first. Mix it together with the sugar and 120g (½ cup) of the water listed in the recipe (note that that means you'll use less water to make the psyllium gel). Set aside for 5-10 minutes, or until the mixture starts frothing. Then, add it to the dry along with the psyllium gel, olive oil and vinegar.
Step 4
Make a well in the middle of the dry and add the psyllium gel, olive oil and vinegar.
Step 5
Knead the dough until it's smooth and all the are evenly incorporated. Use a rubber spatula to occasionally scrape along the sides and bottom of the bowl to prevent any dry patches of unmixed flour.
Step 6
The final dough should be smooth and supple, with no lumps of un-mixed flour or psyllium gel, and it should come away from the sides of the mixing bowl. It shouldn’t be sticky to the touch (note that this refers to when you gently touch it with clean hands – it will stick to your hands as you’re kneading it). Resist the temptation to add more flour to the dough, as that can make your bread dense and dry.
Step 7
When you shape the bread, work on a lightly floured surface (you really want just a sprinkling of flour on your work surface). See the blog post for detailed step-by-step photos of the shaping process.
Step 8
Turn out the dough onto a lightly floured surface and roll it out into a rough rectangle, about 11 inches (28cm) long and 7-8 inches (18-20cm) wide.
Step 9
Working along the wider end, fold the dough over itself and press down gently to seal. Continue folding the dough over itself (and pressing down to seal) so that you’re essentially rolling it up into a log. Pinch the seam together to seal it.
Step 10
Transfer the rolled-up dough, seam side down, to a large baking sheet lined with parchment/baking paper.
Step 11
Lightly cover the loaf with a sheet of plastic wrap/cling film (to prevent it from drying out) and proof in a warm spot until doubled in size, this should take about 1 hour.
Step 12
If your kitchen is on the cold side, put a cup of boiling hot water into your (turned-off) oven – that will create the perfect warm, slightly humid proofing environment.
Step 13
Adjust the oven rack to the lower middle position, place a cast iron skillet or heavy duty baking tray (not glass!) on the bottom of the oven, and preheat the oven to 425ºF (220ºC). Make sure to thoroughly preheat your oven, start preheating it after your bread has been proofing for about 30 minutes. (See the Notes section for extra tips on improving oven spring.)
Step 14
Because you'll add ice cubes to the hot baking tray on the bottom of your oven to generate steam, it will experience quite a huge temperature change. So, don't use a glass baking tray/pan as it could shatter. I recommend cast iron, but a metal baking tray also works great.
Step 15
Once your loaf has doubled in size, brush it gently with the whisked egg white.
Step 16
Use a bread lame or a sharp knife to score the loaf with 5-7 diagonal slashes.
Step 17
Place the loaf into the oven on the lower middle oven rack, place 5-6 ice cubes into the bottom skillet or baking tray, close the oven door and immediately reduce the oven temperature to 400ºF (200ºC).
Step 18
Bake the loaf at 400ºF (200ºC) with steam for 15 minutes. Don’t open the oven door during that time.
Step 19
After the 15 minutes, open the oven door to let out the steam and remove the bottom skillet or baking tray. Close the oven, and bake for 25-30 minutes longer or until the bread is golden brown.
Step 20
I like to check the doneness of the bread by weighing it (you can read more about this method in my book) – when done, the loaf should weigh about 675-695g, which corresponds to a weight/moisture loss of about 12-13.5%.
Step 21
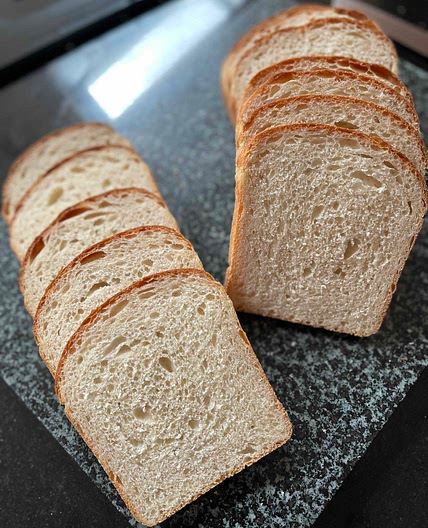
Remove the bread from the oven and cool it on a wire rack until it's at least lukewarm before you cut into it.
Step 22
I know that it’s super tempting to eat the bread while it's still hot or very warm, but the crumb needs time to cool down and fully set. If you cut into it while it's still hot or too warm, you’ll find the crumb quite sticky.
Step 23
Optional If you want to improve oven spring and get a taller, even more rounded loaf, you can preheat your oven with a baking steel or heavy duty baking sheet on the lower middle oven rack.
Step 24
Then, when it’s ready for baking, slide the loaf (along with the parchment/baking paper) onto the hot baking steel or baking sheet. This will improve the shape of the loaf and result in a slightly crisper crust.
Step 25
Note that this is optional – you’ll get a gorgeous loaf with a beautiful texture even if you bake it on the baking sheet that it proofed on.
Notes
1 liked
0 disliked
There are no notes yet. Be the first to share your experience!
