1/17

2/17

3/17

4/17

5/17

6/17

7/17

8/17

9/17

10/17

11/17

12/17

13/17

14/17

15/17

16/17

17/17
Leave a note
Nutrition balance score
Unbalanced
Glycemic Index
61
Moderate
Glycemic Load
38
High
Nutrition per serving
Calories770.7 kcal (39%)
Total Fat53.2 g (76%)
Carbs49.1 g (19%)
Sugars22.1 g (25%)
Protein27.1 g (54%)
Sodium663.1 mg (33%)
Fiber1 g (4%)
% Daily Values based on a 2,000 calorie diet
Ingredients
4 servings
1 cupflour
rounded
¼ tspsalt
½ tspbaking powder
1 tsugar
1 cupmilk
whole milk works best
⅓ cupwater
3 Tbutter
melted
3eggs
jumbo, at room temperature
8 ouncesfarmer cheese
1egg
2 tspvanilla sugar
8 ozcreme fraiche
2 ozjam
jars, preserves, or conserve, to serve 8, red raspberry, blueberry, or blackberry all great choices
¼ cupconfectioner’s sugar
2bananas
optional
Instructions
Step 1
Blender, food processor, or good capacity chopper
Step 2
Fry-pan with a 7-8 inch bottom
Step 3
PAM regular, or comparable cooking spray
Step 4
1/4 cup measure
Step 5
Wax paper
Step 6
2-3 inch metal spatula
Step 7
1 baking dish or pan (I like glass, pottery, or ceramic best)
Step 8
Confectioner’s sugar shaker or fine, small strainer
Step 9
STEP 1 Preparing the crepe batter
Step 10
In a blender, food processor, or good size chopper (I use my Black & Decker SHORTCUT) combine the flour, sugar, baking powder and salt. Process just a little, to mix. Then, line up your measured near you and, with the motor running and via the feed tube, add the rest of the crepe one at a time milk, water, butter, and eggs, also one at a time. Process just until smooth, about 30 seconds. You will see some air bubbles at the top.
Step 11
NOTE If you do not have any of this equipment, you can make mix the crepe batter using a whisk. If so, start with the eggs, and gradually blend in the other .
Step 12
TIP Prepare this crepe batter the night before and store it in the refrigerator in an air-tight container. Let the batter sit for at least 15 minutes — whether you make your crepes right away or the next morning. Whisk the batter briefly just before you begin to cook the crepes.
Step 13
STEP 2 Bring the filling and accompaniments to room temperature
Step 14
In the photo below, you can see the 16-ounce block of farmer cheese (Friendship brand) that I bought and split for use in the second and third recipe test.
Step 15
Put 8 oz. (or half this block shown) of the farmer cheese in a medium bowl and break it up with a fork. Set aside.
Step 16
STEP 3 Cooking the crepes
Step 17
Heat a heavy 7-8 inch non-stick skillet over medium heat. The cast iron frying pan that I’ve had forever worked just fine. When the pan seems hot enough, spray it lightly with PAM, or comparable light oil. If you would rather pour some bottled oil, like Canola, make sure the pan has only an oil sheen before you make a crepe, not puddles of oil. (Wipe up any excess quickly with a paper towel and throw the paper away immediately. Please don’t leave paper anywhere near your stove.)
Step 18
While you wait for your pan to heat, tear off 8-10 pieces of wax paper, each about 10 inches wide. Set aside in a stack on the counter. Next, check the frying pan handle. If it is one that retains heat, wrap a pot holder around it.
Step 19
Now, with one hand, lift the pan off the stove ring. With the other hand, dip a 1/4 cup measuring cup into your crepe batter, filling it just short of full. As you pour the measure of batter into the center of the pan, tilt and then slowly turn your pan so that the batter now swirls around and around, working its way out from the center and expands outward until filling the 7-8 inch bottom of your pan completely. Return the pan to the stove ring and watch the crepe cook for about 1 minute.
Step 20
The top will dry (see above photo). This nice crepe is just about ready to turn over. When you can easily slide a thin spatula underneath, check that the browning pattern is what you want, and if so, flip the crepe. Below is a flipped crepe with the type of browning pattern I like to see.
Step 21
If you prefer a lighter, more dense pattern, remove your pan from the heat, turn the heat down a little and wait (if you have an electric stove) a few minutes before you return the pan to the heat and begin again. Here’s an example of a lighter pattern.
Step 22
After you flip the crepe, cook side 2 for about 15 seconds. Using the spatula, transfer it to a piece of wax paper, flipping it so that the cooler side (first side cooked) goes down against the wax paper.
Step 23
Stack the crepes as you cook them, allowing each crepe to cool a little while you are making the next one. Just before your next crepe finishes cooking, place a piece of wax paper on top of the previously cooked crepe.
Step 24
If you have not made crepes before, the first one you make tells you whether your heat level is too hot, not hot enough, or just right. After a few minutes, when the top side is dry and you are ready to flip it, if the bottom (cooked side) of your crepe has almost no browning pattern and the edges are getting brittle, your heat is a little too low.
Step 25
Alternatively, if, just after you pour the batter into the pan, the batter is jumping around the pan with big air bubbles popping or the batter spread so quickly there are obvious holes, the heat is too hot, and there may be too much oil. Adjust and continue when you think your heat is good. Of course, this varies with the type of stove and fuel source, of course.
Step 26
STEP 4 Finish preparing the filling
Step 27
Before you begin to fill the crepes, use a fork to blend an egg and the vanilla sugar with the farmer cheese.
Step 28
STEP 5 Filling the crepes with the cheese mixture
Step 29
Go through the stack and gently lift each crepe off the wax paper, and set it back on its paper. They can stick a little, and this step will make it easier to fill the crepes. While doing this, select the best 8-10 crepes for filling. At this point, you should have your best crepes in a stack and the not-so-perfect ones removed from your working area.
Step 30
Preheat the oven to 350-degrees.
Step 31
If you are concerned you won’t estimate the portioning of the filling accurately, draw lines with a knife to partition the cheese filling in the bowl, like you are cutting a pie. I usually fill 8 crepes, but you can try to get 10, if you want.
Step 32
Scoop about 3 tablespoons of filling on the center of your first crepe. The generous amount shown below will make nicely plump crepes, but you won’t get more than 8 of them. So, use a little less filling if you want 10 crepes.
Step 33
Do notice that I cooked the crepe above a little too long. Alas, probably distracted! See how the edges are thin and brittle and the inside is too browned… (Once you flip the crepe during cooking, you cook side 2 only about 15 seconds.) The good news is that some crepes, while not ideal, are still usable.
Step 34
Next, fold over the first flap and gently press it down for even height and filling distribution.
Step 35
Then, fold over the two sides, tucking the side edges so you minimize their visibility later in presentation.
Step 36
Finally, flip the crepe to make the final fold. See how you cannot see the edges of the folds?
Step 37
STEP 6 Bake the crepes and serve
Step 38
Spray some PAM lightly on the bottom of your baking dish. Place your 8-10 folded crepes in the dish, spacing them. Now, barely spray across the top of the crepes. Put the dish in the oven and set the timer for 20 minutes. In my oven, the top feels just nicely crisp to the touch at 25 minutes.
Step 39
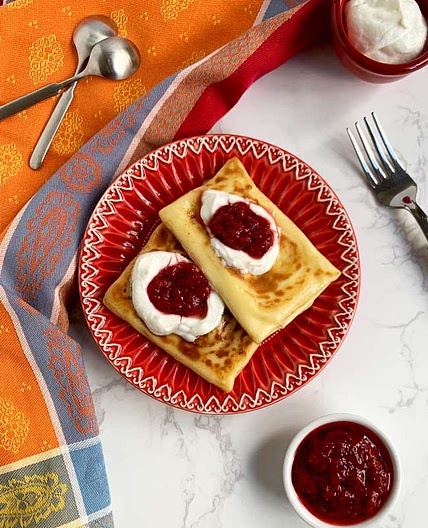
While you are baking the crepes, set up your plates with the accompaniments. Spoon some creme fraiche and jam onto one side of each plate. We liked red raspberry, blueberry, and blackberry/peach, but I would guess other flavors would be wonderful, too!)
Step 40
Get your Confectioner’s sugar ready to sprinkle the crepes when they come out of the oven. (See the green handy-dandy sprinkler below. Inexpensive and available in most kitchen stores.) Make a pot of coffee or tea, put out some juice, if you wish, and set the table.
Step 41
Remove the dish of crepes from the oven when the crepe top is very warm to the touch and the crepes are golden (this photo taken under my stove light, so more golden than actual!).
Step 42
Place two crepes on each plate and gently sprinkle some Confectioner’s sugar over them. Add some slices of banana, if you like. Eat the crepes while they are warm and ENJOY!
View on 3houses.com
↑Support creators by visiting their site 😊
Notes
0 liked
0 disliked
There are no notes yet. Be the first to share your experience!
